Free Bird House Woodworking Plans
Posted on January 15, 2023 • 3 minutes • 595 words
Table of contents
Birdy - A free birdhouse plan with video

I love attracting birds like bluebirds, swallows, chickadees, nuthatches, warblers, woodpeckers, wrens, and other birds to our back yard garden! Its super great for natural pest control and a wonderful addition to our natural garden habitat!
Below are some of my favourite free birdhouse plans that I made for a great weekend project with your kids!
Our free DIY birdhouse plans can be made from few materials and requires basic skills to assemble. You can view the video on assembly below. View more woodworking projects on our youtube channel. If you are looking for a wood bench to buy view all our country wood benches here.Enjoy!
Watch the video of the 3D-Plan
Materials List & Equipment Needed to Build ‘Birdy’ birdhouse
- Lumber: 1″ x 6″ x 5′
- Screws: Approximately 1.5″
- Power Drill
- Hand Saw or Chop-Saw
- Drill Bit: 1 1/2" for the plan
- PPE safety googles and a mask. Always wear PPE and work safely when woodworking.
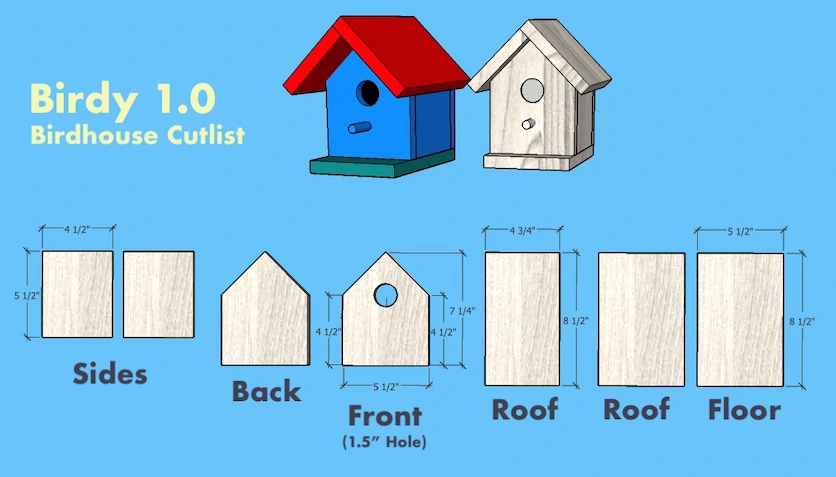
Step 1. Cut the board using the birdhouse plans below.
Cut the 1×6 board as shown in the images below. Optionally sand all pieces smooth. For best results birds like natural wood. I like to use cedar but pine will work fine!
Step 2. Drill entrance hole for the birdhouse
Drill a hole for the entrance using either a spade bit or forsnter drill bit. A 1.5″ entrance hole is the optimum diameter for bluebirds and tree swallows. However, chickadees, nuthatches, warblers, woodpeckers, and wrens will also gladly make this their home. For attracting different specific birds see this article on why birds like certain size entrances.
I used a 1.5" Hole for the birdhouse entrance.
Step 3: Pre-drill the holes.
Always pre-drill so your wood won’t split! Drill pilot holes to help prevent the wood from splitting. Ideally this hole should be at least as large as the screw’s minor diameter.
Step 4: Assembling the birdhouse.
Use a combination of hand-clamps use glue and screws to attach the back to the floor of the birdhouse. Try using wood glue as it is more natural then more synthetic glues. Repeat the process with all the sides and front of the birdhouse. If you want to trim-screw your final results will look more tidy.
Adding a PERCH to your birdhouse - The plan also includes a perch but its your choice. Birds like their privacy when nesting and a ‘perch’ might attract predators to steal their eggs. So keep that in mind

Step 5. Assemble the roof of the birdhouse
Attach the two panels of the roof together. Note the width of one of the top panels on the roof is 3/4″ less than the other panel. When fastened together (as shown below) this will make the overhang the same on both sides. Attach the roof to the birdhouse using only screws. So that it can be later opened for cleaning. See our other tips on how to add clean-out-doors to your birdhouse!
Floor Drainage: Drill several holes in the floor for drainage.
Step 6. Final finish & Painting your birdhouse.
You want to keep your birdhouse lasting a long time so adding a nice finish will keep it resistant to damage from weather. Try to keep your final finish to natural paints , wax or linseed-oil.
Step 7. Hanging or mounting your finished birdhouse.
Certain bird species prefer recommended mounting height for nesting. See this article on hanging your birdhouse with specific mounting height for various birds.
Affiliate Links and Supplies
